Video Example (Click Here) (Access only)
Creating a site for your club comes with a long list of benefits. Your site acts as the official public face of your club, allowing you to increase visibility and share information with your members, prospects, and anyone else who interacts with your club. Your members can log in to their account to view their private dashboard directly from your website, putting all the info they need in one place. Site Builder is a feature that empowers you to create and maintain a site – including multiple pages within it – and you don't even need to know any HTML! Site Builder’s drag-and-drop functionality is intuitive and easy to learn.
Before getting started, log in to your memberplanet admin portal. Your club admin permissions will allow you to have access to Site Builder once you are logged in.
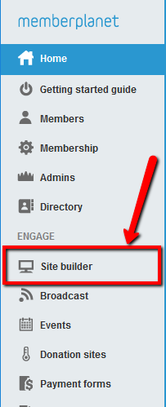
1. In the left navigation sidebar, click Site Builder
1. In the left navigation sidebar, click Site Builder
2. Select the Edit Site button
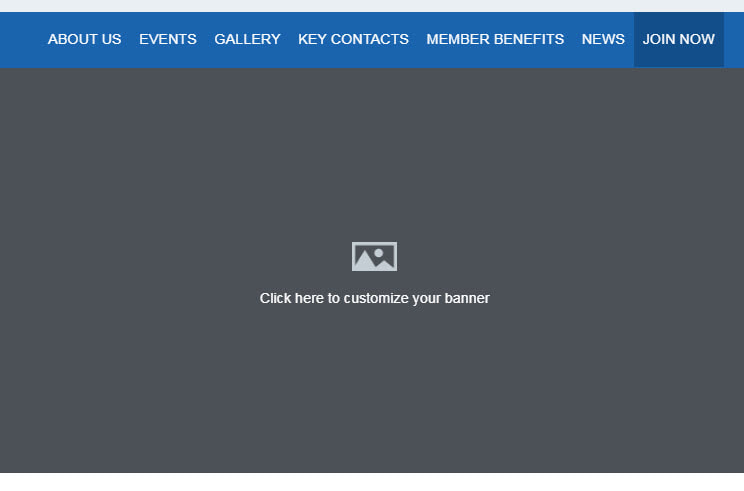
Banner
You can choose one of three banner types for your site by clicking on the Change Banner Type button in the top-left corner of the banner area, which will appear upon mouse hover. These include Single Image, Sliding Banner, and Polaroid Banner. The banner type and banner images you choose will be shown on every page of your site.
You can choose one of three banner types for your site by clicking on the Change Banner Type button in the top-left corner of the banner area, which will appear upon mouse hover. These include Single Image, Sliding Banner, and Polaroid Banner. The banner type and banner images you choose will be shown on every page of your site.
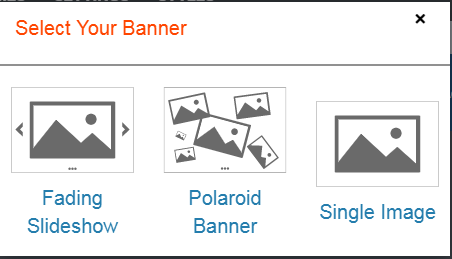
Fading Slideshow: This banner shows a slideshow of multiple images that fade in and out in the order you determine. After you click the Add Images button and select your images, you can change the order of the images, remove images, or use the image editor to customize the images in the slideshow.
Polaroid banner: This banner takes multiple images that you upload and displays them as though they were a loose pile of polaroid photographs scattered across a table. Just like the slideshow banner, upload your images, put them in order, and edit them as desired.
Single image: This displays a single featured image. Once you upload the image and save, you can adjust the crop and the height.
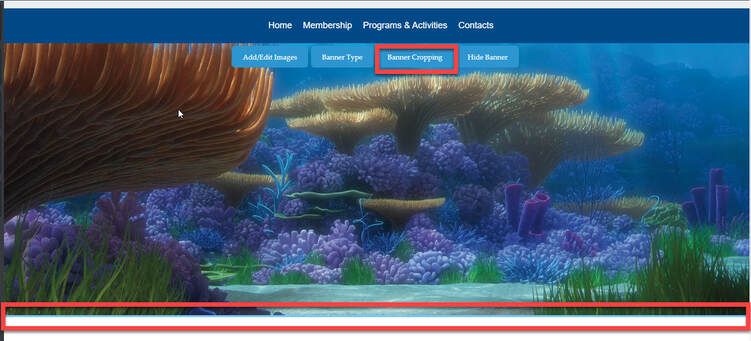
- If using the single banner option, you can control the height and crop of your banner image using the banner cropping button to allow your image to be grabbed and moved up or down.
- Or use the height option to adjust your banner and make it taller within your website.
- Your single banner image is enabled with the option to add Title, Text, Social Icons, or Buttons on top of your banner, simply drag and drop the elements over the banner and drop in to place
Elements
3. You have an array of site editing tools at your fingertips to create a professional site, including these four main editors in the top nav bar: Elements, Pages, Themes, Settings
To move an element that is on the page, hover over the element and place your cursor over the move icon that appears at the top right. Click the move icon (do not release), then drag and drop it to the desired area on the page.

Select Elements in the top navigation bar. From here you can add, edit, or remove content such as text and images tor a page on your site. The Elements editor lets you edit content on one page at a time.
The Elements editor is divided into two main parts:
1. Content palette
2. Page canvas
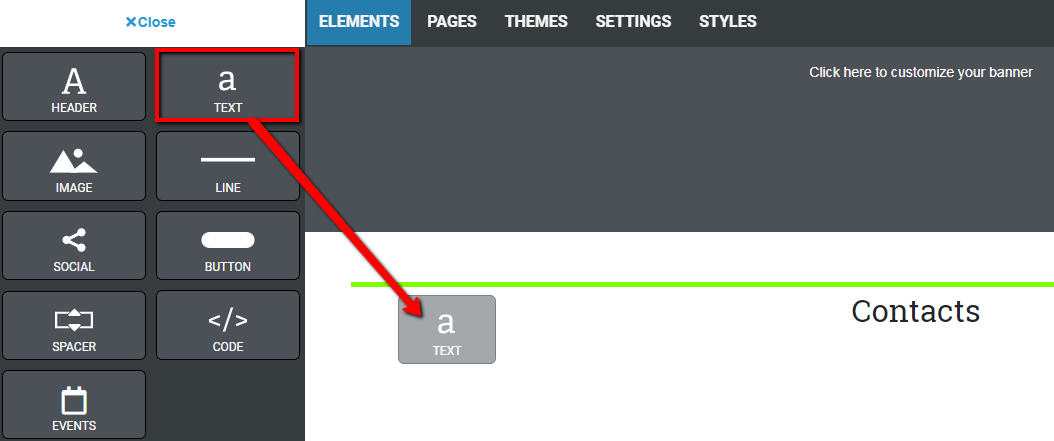
When you add content to a page, you do it one chunk at a time. For example, you might first add some text to the page, then add an image second, and then add social media links third. Each chunk of content is called a content block and each type of content block is represented by a box in the left-hand sidebar. This sidebar is called the content palette.
To add content to a page, drag and drop an element from the content palette onto your page canvas. A green line will appear to assist you in placing the element.
Select Elements in the top navigation bar. From here you can add, edit, or remove content such as text and images tor a page on your site. The Elements editor lets you edit content on one page at a time.
The Elements editor is divided into two main parts:
1. Content palette
2. Page canvas
When you add content to a page, you do it one chunk at a time. For example, you might first add some text to the page, then add an image second, and then add social media links third. Each chunk of content is called a content block and each type of content block is represented by a box in the left-hand sidebar. This sidebar is called the content palette.
To add content to a page, drag and drop an element from the content palette onto your page canvas. A green line will appear to assist you in placing the element.
- Text elements: Click on the element itself and start typing or past text in to the area. Use the tools to format your text. or use the link option to hyperlink your text. Use the document option to add documents to our site builder document storage and link documents to your site pages
- Header elements: Click on the element itself and start typing or paste text into the area to give your site larger bolder header text
- Image elements: Hover over the element and click the edit icon, then select the Edit button to use the image editor.
- Social and Button elements: Hover over the element and click the edit icon. Add button text and links.
To move an element that is on the page, hover over the element and place your cursor over the move icon that appears at the top right. Click the move icon (do not release), then drag and drop it to the desired area on the page. - Spacer: Click and drag the resizing options to add a blank space within your site
- Code: Use the html code block from your social media, video sharing tools and more to add outside code blocks in to your website
- Sections: Click and drag to add a section. Then drag other elements from the content elements to add content in to your section. Using the section tools you can change the colors of your section to create a colored block within your site
- Text and Header elements: Click on the element itself and start typing or paste text into the area.
- Image elements: Hover over the element and click the edit icon, then select the Edit button to use the image editor.
- Social and Button elements: Hover over the element and click the edit icon. Add button text and links.
To move an element that is on the page, hover over the element and place your cursor over the move icon that appears at the top right. Click the move icon (do not release), then drag and drop it to the desired area on the page.
Pages editor
You can use the Pages editor in the top nav bar to go to a selected page and edit the content on the page.
You can use the Pages editor in the top nav bar to go to a selected page and edit the content on the page.
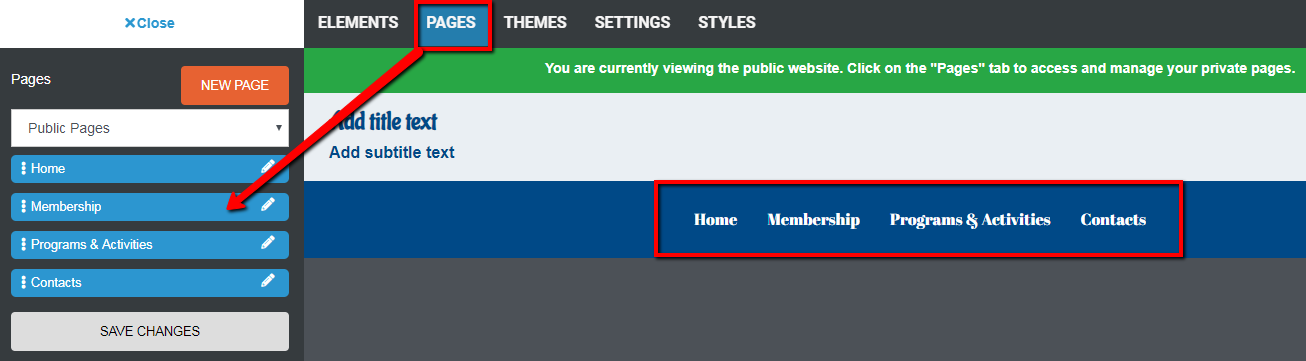
- In the top navigation bar, click Pages
- In the content palette, select from the dropdown menu whether you want to navigate to Public Pages or Private Pages
- Click the page you wish to edit
You can also navigate to another page by clicking on the page name listed in the palette.
Edit existing content
Each content block has a few different things you can customize by clicking the edit or pencil icon on its component block on the canvas.
Images
If you’ve already added an image to an image block, when you click the edit icon, you’ll have the option to replace the image. You can also resize an image by clicking on the image and clicking and dragging the blue boxes on the corners and sides.
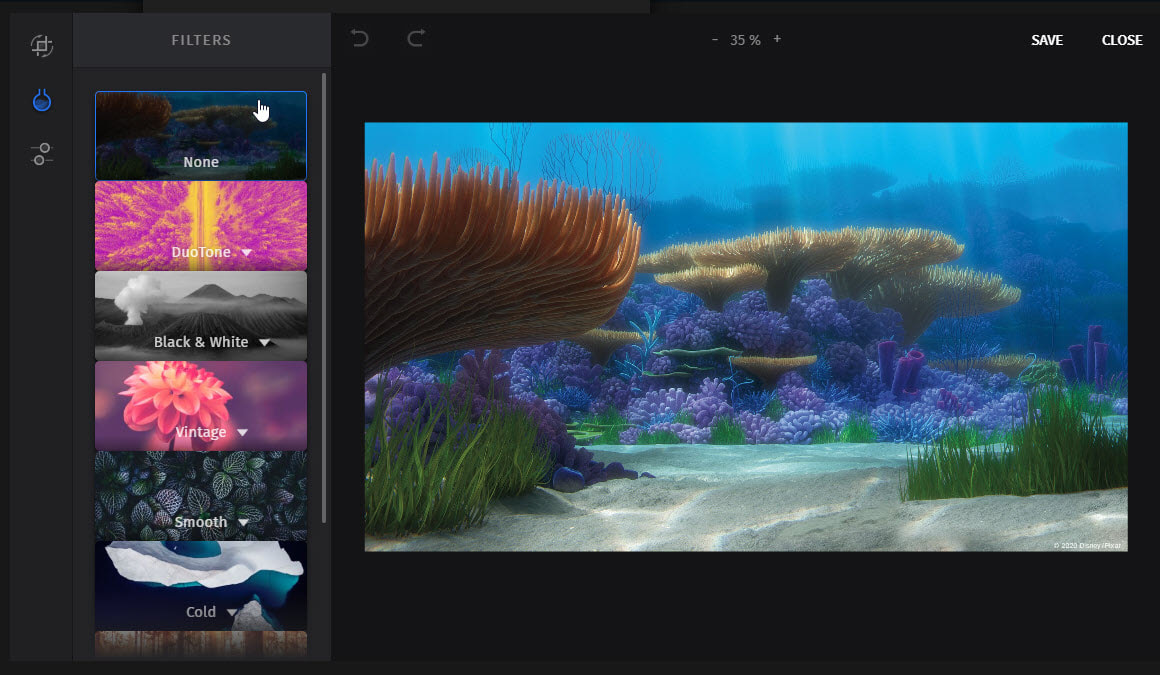
Clicking the Edit button will open the image editor, which includes graphic design controls for color balancing, adding fun graphics to the image, and adding frames.
Images
If you’ve already added an image to an image block, when you click the edit icon, you’ll have the option to replace the image. You can also resize an image by clicking on the image and clicking and dragging the blue boxes on the corners and sides.
Clicking the Edit button will open the image editor, which includes graphic design controls for color balancing, adding fun graphics to the image, and adding frames.
Text
Upon clicking on a text block, some basic formatting tools will appear for you to style your text and add links.
Upon clicking on a text block, some basic formatting tools will appear for you to style your text and add links.
Social media icons
When you click on the content block and click the edit icon, you will be able to add the URL for each social media icon and re-order them. If you don’t have URLs for all of the social media sites, just uncheck the checkbox next to them and they will be removed from your page.
Buttons
Once you click on the content block, you will be able to add a URL to your button. Any URL, including external links or links to forms, can be added.
Save changes
Changes you make in the Elements editor are auto-saved. This will save changes to your draft, but they won’t be visible to site visitors until you publish the site. Your changes will also be saved any time you click off of a content block or leave the Elements editor to go to a different part of the Site Builder.
Note: Because changes are saved automatically and frequently, there is no way to revert to an earlier draft. Undo functions are limited to changes within a content element.
Preview your site
At any time, you can preview your changes by clicking on the Preview button on the top right. In the Device dropdown menu, you also have the option to preview what your site looks like on desktop, tablet, mobile landscape, and mobile portrait views.
Draft mode
Your site will be in draft mode until you are ready to publish it. Until you publish the site, it will remain hidden. Be sure to fill in all of the blank areas and add some images to your banner before you click the Publish button, or they will not be included when you publish your site.
Publish and re-publish your site
Before you publish, it is a best practice to preview your site by clicking the Preview button near the top right. When you are ready to make your site visible to visitors, you can publish it for the first time by clicking the Publish button, which is next to Preview.
Important note: After you’ve published your site, you will always have two versions of it that exist at the same time: a draft version and the published version. When you edit your site and your changes are saved, only the draft version will be changed and stored. When you click the Publish button to re-publish your site, all of your saved changes will be copied from your draft version to the published version, meaning that the changes become visible to visitors on your site. This allows you to make multiple changes to the site and release them all at once instead of exposing your visitors to the changes as you make them one at a time.
Important note: After you’ve published your site, you will always have two versions of it that exist at the same time: a draft version and the published version. When you edit your site and your changes are saved, only the draft version will be changed and stored. When you click the Publish button to re-publish your site, all of your saved changes will be copied from your draft version to the published version, meaning that the changes become visible to visitors on your site. This allows you to make multiple changes to the site and release them all at once instead of exposing your visitors to the changes as you make them one at a time.